Showing posts with label ideas. Show all posts

WIP: painting and modelling.


I've wanted to have a go at this idea since I started my Astral Knights and I've finally plucked up the courage to give it a try. Details and more pictures after the jump...

Legion Basilisk

Just seen this over in the new stuff section on the forgeworld site. Now I'm really tempted. If you love your marines but always had a hankering for a bit of imperial guard artillery action then this could be the tank for you. I love the look of it but I've no idea of the rules so if anyone has an idea if it's any good let me know...

Kings of War Week on Beasts of War


I'm sure you're all aware of Beasts of War, if not then follow the link immediately... Now you're back or if you didn't go anywhere read on.

WIP: Ratling Sniper Bases.


I got a little bit distracted by my new toys whilst I was supposed to be painting up my standard bearer.  Having seen some of the amazing bases that James Wappell produces I wanted to have a go at something special for my little snipers.

WIP: standard bearer and a little surprise...


Now I love snipers. So when I saw these cute little guys on eBay I couldn't resist. Five little ratling snipers, and not the modern ones, these guys must be best part of 20 year old designs.

Astral Knights helmet options.


I just spotted these over on puppets war. I think they would look amazing as helmets for elite power armoured members of the Astral Knights. What do you think of these on sternguard or vanguard veterans?

Going Old School: Turning 2nd into 6th.


I needed to turn my oh so retro 2nd edition devastators into believable members of my 6th edition Astral Knights army. So this is what I did...

Going Old School: Retro models.


I really enjoyed the process of stripping, remodeling and repainting my old librarian figure and it's inspired me to add a retro element to my astral knights army.

WIP: Astral Knights Librarian

After my plea for help posing my old metal librarian model Zab and Ieuan came to the rescue with some great ideas. Read on for more details of how he's going...

Resurrecting the dead: redoing an old librarian.

Wish I could make mine look this good!

The painting competition at my local GW store has changed format slightly and now we are given a theme for each month rather than a particular model. Hopefully this will encourage more people to take part as they can tailor it to fit their own collection.  This month the theme is Wizard.

1st mock up of an Astral Knights Biker.

This is the first mock up of an astral knight biker that I have done.  Currently it is held together with blue tac...  I thought I would post it up to get feedback or any ideas before I finalise the set up and start the squad.  Lots more images and details after the break.

Ideas for Astral Knights Bikers

As I've said before I want to give the Astral Knights the look of 41st millennium knights riding into battle with lances, shields and fluttering banners.  Here are some of the ideas I've been mulling over to try and achieve this look.

Firstly the armour of the marines.  There aren't many options for the basic biker marine legs so I'm going to try and get as many Ravenwing cloaked legs in as possible.  Hopefully these will give the look of the robes that knights used to wear.

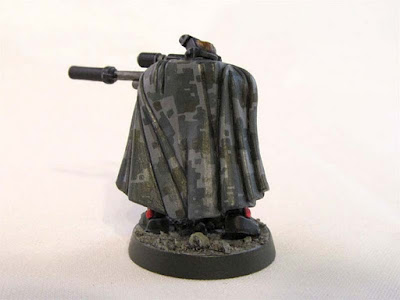
Ideas for painting camouflage cloaks

As you may have seen from my recent posts I am part way through painting a sniper scout squad for my astral knights chapter. I'm happily plugging away through the armour, fatigues, details etc but I am starting to worry about the cloaks.

I want to do them in a camouflage pattern but I'm not sure how to do this.  Normally I would paint a cloak by basing it in a dark colour and using one of two methods to give it definition. 

Method 1:  Wet blending.  This can be time consuming but creates lovely gradual changes of colour to give depth and definition. Here is an example from the back of my sergeant's banner.


Method 2: Layering, this is often easier and quicker than wet blending but doesn't give such smooth transitions from one colour to the next.

The Problem.

I can't use these methods with camouflage patterns.  As the cloak changes colour you can't highlight along the folds without destroying the pattern.

These are the looks I am  going for.   All these images are other peoples work that I've found on the Internet.


This one looks amazing, the digital camo pattern is stunning and there is even good definition into the folds.  I'm assuming that the pattern must have been painted on and then the shadows put in afterwards.


This is very effective and if Ron at from the warp is to be believed is very easy to do, there is a tutorial here.  He has shaded the cloak using washes and layering first and then used thinned paints and washes to give a suggestion of camouflage afterwards.


These last two images are included more as a guide for myself in terms of colours, I think that using the varied blues and greys of my armour colour scheme would give an interesting camo scheme whilst still tying the scouts to the rest of the army in way that green wouldn't.


So it looks like I'm left with a difficult choice. Do I try to paint on the camo pattern on first and then use washes etc to put the shadows into the folds, or do I put the definition in first and then go for a more subtle camo pattern using thinned paint etc over the top?

Does anyone have any experience in this area? Can they suggest a best method?  Please feel free to leave comments, hints and tips.

Squad and company markings for my Astral Knights

Having ummmed and ahhhhed for quite a while I have finally decided on a system of squad and company markings for my Astral Knights chapter.

I wanted each squad to have an heraldic design, like a knightly order, but a complicated design would be too much to freehand on every marine so I have come to a compromise.  Each squad will have a geometric design using blue and white, which will be painted on the right shoulder pad.  This design will also be used on any banners, shields or other areas.  

For my first tactical squad I have chosen a simple diagonal bisection from top left to bottom right, but I could do all sorts of things; vertical bisection, horizontal bisection, quartering, etc...


Shoulder pads done on these two marines.


Shield done on the sergeant.

On the banner I have used the design as the background and done the chapter symbol in the reverse colours to make it stand out.


The company number is marked using roman numerals somewhere in the design on the right shoulder pad as you can see in the photo below.


Ideas for painting power swords

I've been searching around for ideas to help with painting my sergeant's power sword.  I've come up with the following options.

Option 1.


This one is courtesy of from the warp.  It uses repeated line highlighting and washing to give a lightning like effect from the tip down the blade.  Of course the colour could be varied or it could be done from the bottom up.  This is another example from the warp. (images from the warp)


Option 2.

The NMM effect beloved by grey knights.  This can look amazing but having looked around at how to do it I may be slightly out of my depth trying to replicate it. (image from Buypainted.com)


Option 3.

Necron style edge highlighting.  This example is from Ieuan over at Sons of Isis and he's done a brilliant tutorial so I think that even I could follow it.


Option 4.

Plain silver. An oldy but a goody...  (image from GW)


I'm leaning towards option 1 at the moment but would appreciate any other ideas or suggestions. So please feel free to voice your preference, give me some ideas or point me in the direction of something I've missed.....

Freehand vs sculpted chapter badge

Having tried both freehand and using the DA sword shoulder pad to do my chapter badge I'm not sure which is best.  The sculpted pad looks more official and interesting but the shape of the sword makes it harder to see the star design behind.  I also, rather surpisingly, found it easier to freehand the entire design instead of working round the sword that was already sculpted on.

Most importantly it is going to come down to what looks best.  So which do people prefer?


Tactical squad sergeant

For my tactical squad sergeant I wanted to go a little bit further with modelling something unique for the Astral Knights.  Firstly I wanted to give him a sword and shield, the archetypal knightly weapons, however a tactical squad sergeant wouldn't look right with purely assault weapons.  So I have put a small shield from the terminator sprue (I think) on the right hand which holds the bolt pistol, it provides no actual benefit in a game but it looks the part especially with the sword symbol on it. 


I may have gone a bit ott with the sword as I have used one from the champion set and it's huge but I suppose you can never have a sword that's too big.

You can't help but notice in the photo above that he has a 'plume' of feathers.  These are from an imperial knight WFB set and have been put onto a helmet that has a more medieval style face plate.  I really like the individuality this gives him, he stands out from the rest of the squad and I've never seen marines with this type of head gear before.


The only issue I have with it is making the join between the plume and the helmet look more 'official' and less converted.  Does anybody have some tips for greenstuff methods or something else that would make it work better.

I am still trying to decide if I want to add a banner to the sergeant.  He's got the height that makes him stand out from his helmet but I'm a sucker for models with banners.  So do I try the standard marine banner, hanging down from a horizontal crossbar, or do I try to model one that flaps out behind him from a single vertical pole, or do I leave well alone?

As always any thoughts, comments or suggestions gratefully received.

A more dynamic pose for a basic boltgun marine

I tried to give one of the basic marines a more dynamic pose.  The idea was that if they are deployed as two combat squads then I need a marine to lead the more shooty half (including the missile launcher).  So this guy looks slightly more senior than the rest, hence the sword on the backpack and also he is modelled to appear as if he is a long range shooting expert.  I've put the telescopic sight on his boltgun, given him the head with the targeter attached and posed him as if he shooting single handed at a target far away.


How was it done?

The legs, body, head and backpack are as normal.  The right arm uses a left over arm from a biker with the hand swapped for one holding a gun.  For the left arm I had to use an old metal version as I didn't have any plastic arms that looked right.

Does he look better with the knife in hand or not?  What do people think?

I also think his right thigh needs bulking out with some equipment to balance the model and give him some more mass.

Second combat squad (kitbashing)

My first Astral Knights combat squad was very plain in terms of the models used as I was testing out the paint job more than anything else.  As I was very happy with the way they turned out, I have decided to have a go at making the second combat quad a bit more unique, using modelling as well as the paint job to make them stand out from vanilla marines.

Here is my first attempt.  This guy uses bits from the Dark Angels Vets boxed set to make him look like an experienced Astral Knight who has lots of battle honours and iconography on his armour and equipment.  Note the swords on his bolter, backpack and shoulder pad. 


So what do people think?  Is it going to make a difference when painted up?
More to come as well so keep an eye out for the rest of the squad.....

Why did I do the boltguns separately?

You may have noticed from my WIP posts that I do the body of my marines first, then paint the boltguns separately before attaching them. Why do I do this?

I find that it enables me to paint the chests etc of the marines much better and I always like knowing that even the bits I can barely see are painted as well as I can, but, there are problems.

How do you paint the boltguns on their own? I have to glue them to spare plastic (in this case shoulder pads) to be able to hold them, then break them off and reglue to the marine.


I've wasted some time! There are areas painted to my best abilities that no one will ever see.  Quite the reverse of what most people would suggest (see this link from the warp).

So for my next combat squad I'm going to try weapons on painting.......

What do you do in these kind of situations? Any tips for painting in awkward corners?